

Microphone Selection and Placement
An in-depth discussion of microphone techniques in every different situation could fill volumes;
the following is intended as a general overview for a variety of instruments commonly encountered
in the studio using readily available microphones.  This is not intended to be an exhaustive discussion,
but rather a point of departure, for the true rule is that there are no set-in-stone rules.  Experiment
and use your imagination once you have mastered the basic techniques.

Acoustic Guitar: recommended Neumann KM-184, AKG C-460B
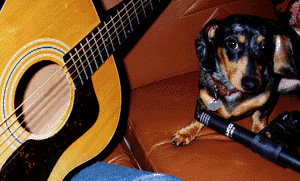
The acoustic guitar is a rather difficult instrument to record well.  The subtle quality of
the overtones and such make it a very complex sound to capture.  Firstly, it is my opinion
that one should never record the piezo pickup mounted in some guitars; I know, I've heard
it done on major-label productions too, but I still think it sounds thuddy and metallic.  A
good condenser mic (or two) is optimal; however, if all you have is a choice between an
SM-57 or the pickup, I'd use the SM-57 every time.

Avoid aiming the mic directly at the sound hole; to do so will produce an overly boomy
result.  Position the mic 8" to 12" away aimed about where the neck and body meet (usually
around the 14th fret)  I normally use just one mic, but for a larger than life sound, place
one mic as discussed above and a second mic an equal distance away aimed at the bridge;
this will pick up more of the midrange and bite and the two signals be blended to taste
in the mix.
Electric Guitar Amps: recommended Shure Beta-57, Sennheiser 421
Much of the sound of an electric guitar is determined by the amp and its respective
settings; note: there's no substitute for a quality tube amp up good and loud.  For a cleaner electric tone,
a small diaphragm condenser, like the AKG C-460B, aimed toward the side of the speaker
cone works well.  Some engineers like to place three or four mics all around a guitar amp;
I've never found the need to do this - one good mic up close has always been quite
adequate for me.  Oh, you'll probably have to use the -10db pad on the mic to prevent
distortion if you've got the amp up loud (as you should have it).  I know it's a bit unorthadox
to recommend condenser mics in this application - lots of folks say that since the frequency
response of guitar amps is primarily limited to the midrange, why bother trying to capture
frequencies that aren't there.  All I can say is try it for yourself; mic the amp with a 57 (or
equivilent dynamic mic) and then with a condenser and see if you don't hear quite a bit of
difference.

Acoustic / Upright Bass: recommended AKG C-414, Neumann U-87
For an acoustic bass guitar, use a large diaphragm condenser placed 6" above the bridge
and aimed slightly (to taste) toward the sound hole.  For an upright bass, a Neumann U-87 placed just outside the f-hole along with a large or small diaphragm condenser just above the
bridge works well (on two separate tracks).  The bridge mic can then be blended to taste
in the mix to achieve the desired amount of attack, string vibration, etc.  Keep the mics within
12" of the instrument, or you're likely to get phase cancellations from the reflections of the
sound on the floor.  You don't really want a lot of room ambience on a bass track anyway
(try putting outboard reverb on a bass track sometime just for fun and listen as the mix instantly
turns to mud).
Electric Bass: recommended Countryman active direct box, for cabinet AKG D-112, Audio Technica ATM25
Electric bass is the one instrument (other than digital keyboard) where I'll recommend just
running it direct; HOWEVER, that's only if you can do so with a good active direct box
and a high-quality preamp (preferably a preamp w/ a big transformer).  I have a Avalon VT-737 tube preamp
with a built-in direct input and opto-compressor that I think is God's gift to bass tracking.
If all you have is the pres in your 8-channel line mixer, put one of the above mics on the
speaker much the same as you would mic a clean electric guitar amp.  If you want more top
end, you can point the mic directly at the center of the speaker; if you want less top and more
bottom, aim the mic more toward the side of the speaker.
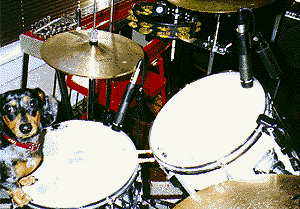
Drum Kit: recommended snare: Shure Beta-57, toms: Sennheiser 421, Shure Beta-57,
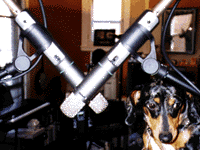
kick: AKG D-112, Electro-Voice RE-20, Audio Technica ATM 87R, hat: Shure SM-81, AKG C-460
overheads: Neumann TLM-103, Neumann KM-184

Drum kits without question present the most difficult recording problems: multiple mics
each picking up the other's sound source, phase relationships, etc.  I think the best way
is to keep it as simple as possible (I rarely even mic the hat individually).  The larger the
room in which the drums are to be recorded, the less you'll have to mess with them in
the mix to achieve space.  Also, it should be said that just as with other instruments, the
recorded sound of the drum set is a product of its acoustic sound, meaning: if the kit
sounds bad in the room, the best mics in the world won't make it sound good on tape.
So get out the tuning key and get the drums sounding like you want them before you
reach for the mics (i.e. if you want a tight cracking snare sound, tune it like that).

For kick drum, mic placement depends on the sort of sound you want.  If the drummer
doesn't have a hole cut in the front head for the mic and doesn't want to cut one, have
him / her remove the front head.  A full drum sound is obtained by placing the mic just
outside the drum.  The further inside toward the head, the drier and less bottom-heavy the sound
becomes, and the better the acoustic separation from the rest of the kit. For a lot of top-end
slap, point the mic directly at the beater (a wood beater will increase the attack even more)
about 4" away.  Directing the microphone away from this point toward the rim will mellow
the sound.  For most rock and country applications, you'll want to point the mic at the
beater; for some jazz and blues, you'll want that more mellow rounded sound.  Also, when
you mic a drum from the inside, it often helps to flip the phase on that channel (if you
believe in the audibility of absolute phase, as I do - so that's what that switch is for!)

For snare, angle the mic downward toward the top head as much as possible (almost
perpendicular); this will prevent the hat from spilling over into the snare track.  Close
distances are fine - usually desired; I put the snare mic about 1 1/2" - 2" above the head and
edge of the rim.  You can drastically alter the sound of the snare by moving the mic
just a little bit, so experiment and find the particular sound you like.

Treat the toms much the same as the snare.  I will note that it is not always necessary
to individually mic the toms.  This depends upon the style of the music, etc.  Did you
know that on most of the Beatles records, there are only 2 mics on Ringo's kit - one
in front of the kick and one overhead?

Try to keep the overheads about the same distance from the snare to prevent phase
cancellation wandering of the stereo image, etc.  You can use either a spaced pair or
an X-Y technique (described below for piano).  The spaced pair will yield a more
dramatic stereo image, but the tradeoff is the potential for phase cancellation.  Use
your ears and fit the placement to the musical style.  It's also a very good idea to use
two mics of the same make and model; if this is not possible, at least use two mics
of the same type (i.e. two small or large diaphram condensers).
Piano: recommended Neumann TLM 103, AKG C-414, AKG C-460B
If you have a pair of any of the above mics (condensers are all I'll use on piano), a stereo
X-Y technique (see photo below) yields the most natural sounding results.  If you only have one mic
(or channel), go with the TLM-103 placed about 2 feet (24") above the center of the soundboard
and slightly toward the front.  You may have to experiment with exact location since every
piano is unique in both sound and physical layout.

For digital keyboards, just run the thing direct through a passive direct box; I've never found
any substantial benefit in miking a keyboardist's amp.  The exception to this is for organ - if
the player has a spinning speaker cabinet, definitely put a couple of mics on either side of that!
Mandolin: recommended AKG C-460, Neumann KM-184
Place the mic about 12" away, perpendicular to the instrument and pointed toward the treble
f-hole.  If the sound hole is guitar-style beneath the strings, aim upward at it from below
(the treble side) about the same distance away.  If the sound is too thick, just back the mic
away from the instrument until the desired color is achieved.
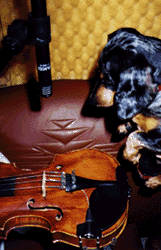
Violin / Fiddle: recommended Neumann U-87, Neumann KM-184, AKG C-460B
If you want a bluegrass / country fiddle sound with lots of bite, place the mic directly
above the bridge about 8" - 10" away.  The smoother the sound desired, the farther away
the mic should be - up to 3 or 4 feet away if necessary and the more off-axis.  I won't use
anything but a condenser on violin.  Additionally, like pianos and especially
acoustic guitars, every violin has it's own unique tonal qualities.  You may want to
experiment with the exact positioning of the mic in order to compensate for or bring
out particular idiosyncrasies in the instrument.
Brass / Woodwinds: recommended Neumann U-87, Sennheiser 421 (lower brass)
Woodwinds such as flute, clarinet and oboe should be much like the saxophone,
described below; I think a condenser is required to get the full body of the instrument's
tone.

Brass (trumpet, trombone, tuba): the lower brass instruments can benefit from the bass
response of the D-112; the Audio Technica ATM25 also works well.  These mics, being
dynamic in operation, can additionally withstand bursts of sound pressure that would
overdrive a condenser.  For trumpet, I've had pretty good luck with the Audix OM-7.
In all cases, a working distance of a little over a foot (12") is in order, with the mic
aimed slightly off axis from the bell to prevent excessive wind noise.
Saxophone: recommended Neumann TLM-103, Sennheiser 421
Microphone placement for the sax depends on how much key noise you want.  If you
consider (as I do) the clicking of the keys as characteristic of the sax's sound or the mood
of the particular song, aim the mic at the middle of the instrument.  However, if you regard
key noise as a bad thing, aim the mic toward the front edge of the bell; do not stick the mic
all the way into the bell - all you'll hear is wind noise.  In both cases, the mic should be
about a foot (12") away
Harmonica: recommended Shure 520D (Green Bullet)
I think the Bullet is the only mic for electric harmonica.  However, if one isn't available, just
about any quality dynamic mic will work fine (SM-57, SM-58, Audix OM-7, etc.)
Voice: recommended Neumann U-87 / U-47, Neumann TLM-103, Shure SM-7
Vocals (along with drum kits) are probably the most difficult instruments to record properly.
Also, I find it just about impossible to get a good vocal track without using a little compression / limiting
going to tape - and that the microphone preamp is nearly as important as the mic itself.
Personally, I've fallen in love with the Neumann U-87 coupled
with a Focusrite preamp.   There are several other large diaphragm condensers out there
that do a great job as well.  (If anyone runs across an old Telefunken mic cheap, let me know).
It's really a matter of matching the mic to the voice; A mic that sounds stellar on a male baritone
may sound awful on a particular female soprano.  Try every mic you've got, and you may be
surprised at which one sounds the best on a particular track.

As to placement, there are 2 main things: (1) Don't let the singer eat the mic - singers who do
a lot of live performing are used to putting their lips right on that SM-58 (or whatever they're
using) and belting away.  That's on stage; remind them of that.  A distance of 4" is minimum
to prevent excessive breath noise and sibilance.  (2) Keep the mic slightly off axis  - it's
best to have the singer sing slightly over the top of the mic or to the side of it rather than
directly into in (forget what you see in music videos).  Actually, there's a real art to working
a microphone which is the domain of the vocalist; if they don't know how to do it, you'll
have to compensate with compression.  As long as they don't distort the mic or "s" and "p"
it to death.  You can prevent most pops and wind booms with a clip-on pop filter (you know,
those round loops with the nylon hose stretched across them); this also helps you keep the
singer at the proper distance - simply mount the loop about 4" away from the mic.
Now, drop us an e-mail and tell us how it went, who you are, where you are, your favorite beer, whatever. If you've got a specific microphone question that doesn't seem to be addressed above, write and ask - maybe we'll know. Cheers!
For a collection of links to dozens of microphone & recording gear manufacturers,
stop by our links page.
Site Index / Renaissance Recording Front Page / Tips & Techniques / Microphone Placement / Tracking / Mixing /
John Wheeler Band - Hayseed Dixie Site / Who's the Dog?